
Say you’re planning a new .NET application and deciding on a cloud platform, obviously it would make sense to go for Azure because they are both Microsoft products. However, perhaps surprisingly, .NET is also a first-class citizen on AWS. After developing .NET applications on AWS for several years now I would like to share why I would recommend AWS as a solid cloud platform choice for .NET applications.
1. First-class C#/.NET support for AWS Lambda
AWS Lambda is the main serverless component of AWS. It is the AWS counterpart of Azure Functions. To oversimplify it, you use it to run code in the cloud without worrying about what it runs on. Additionally, it is pay-per-use and has a very generous monthly free-tier. During months of development and testing with a full development team we weren’t charged a single penny. So definitely don’t be afraid to give it a try.
There are many use cases for a serverless component such as Lambda, but perhaps the most common one is processing events or data. It can subscribe to events from message queues, file storages, databases etc. Or you can just manually feed it some data to process. All of this can be done with C#/.NET code which is great, but nothing new compared to Azure Functions though right? The real power lies in Lambda’s support for ASP.NET Core.
ASP.NET Core
Basically you can run your whole ASP.NET Core web application, for example a REST API, on a single Lambda. No separate Lambda per API method, but your whole set of API controllers in one Lambda. So how is this done? Well, Lambda’s process data, usually in JSON format. On AWS we can use API Gateway to accept HTTP requests which then get converted to JSON and given to the Lambda to process. The Lambda’s result then gets converted to a HTTP response and returned to the requester. The ASP.NET Core framework doesn’t know about any of this and just treats the request as if it came from any webserver, so it will route the request to the correct controller and method.
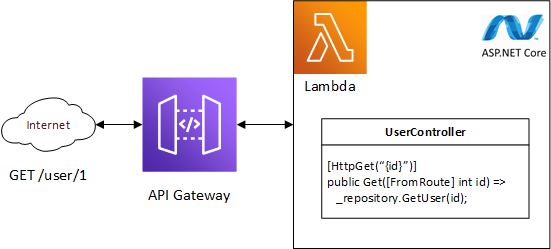
API Gateway converts your HTTP request to something Lambda understands. The Amazon.Lambda.AspNetCoreServer package converts the Lambda input into something ASP .NET Core understands. ASP .NET Core handles the request just like it would if it came from a regular webserver and routes to the correct controller and method.
This way you get all the ASP.NET Core goodies for free, such as dependency injection, authorization, configuration etc. Serverless hosting of your ASP.NET Core web application with only two cloud components and barely a noticeable difference in the code? Read more about it here.
2. Infrastructure-as-code in C#
If you’re not yet part of the everything-as-code movement you should probably get moving because you’re missing out! I also plan to cover this subject more on this blog. It’s great to be able to specify your whole cloud infrastructure in code instead of logging onto the Azure Portal or AWS Console jungles to click all your components together. Small cloud component configuration change? Edit it in code and push it. Assuming you have good CI/CD, you have now applied your configuration change.
AWS offers CloudFormation as an infrastructure-as-code solution, similar to Azure ARM. Just simply defining your whole infrastructure as a CloudFormation template can still be quite messy though. All the different components with each their own settings can become quite large and the JSON or YAML format doesn’t provide much of an overview. This is where the AWS Cloud Development Kit (CDK) comes in. The CDK allows you to use C# to define your infrastructure. Not just that, but it provides so called “constructs” that make it easier to create and configure cloud components. For example you can create an S3 bucket (AWS file storage component) using:
var bucket = new Bucket();And a Lambda using:
var function = new Function();Constructor parameters left out for clarity.
Not only is this all you need to write to create these components, both of these objects will now also have several helper methods to extend their configuration. For instance, you can now say:
bucket.GrantReadWrite(function);And the CDK will take care of creating roles and policies to allow your Lambda to access this S3 bucket for reading and writing. Go take a look at what monstrosities you need to have in a CloudFormation template to achieve the same, or how much clicking and typing it takes in the AWS Console, and you will understand how powerful this is.
3. Full-feature .NET SDK
I guess this one is pretty much an open door, but still worth mentioning. The parts of the AWS SDK for .NET are easily installed through NuGet. Pretty much all the main AWS Services can be interacted with using this SDK. Many services also have higher level helper methods to simplify using these services even more. For example reading a file from an AWS S3 bucket (file storage):
var stream = await amazonS3Client.GetObjectStreamAsync("<bucket name>", "<bucket file path and name>", null);Now you have a stream of the file. Want to write a file to that same storage?
await amazonS3Client.UploadObjectFromStreamAsync("<bucket name>", "<bucket file path and name>", stream, null);Simple as that. Obviously this is only the tip of the iceberg. The SDK provides an extensive list of API’s for almost every service so you can perform even the most advanced operations.
4. Easy SPA hosting
This isn’t directly related to .NET, but indirectly this definitely plays a part. All of the frontends I currently create are Single Page Applications (SPA), built with Angular, React, Blazor WASM or any other such framework and this seems to be the case for other .NET projects around me as well. It makes sense to host this frontend on the same cloud platform and of course this should be pain-free. I’ve found this to be the case on AWS. There are two relevant services, one of them optional.
AWS S3
The main service for hosting a SPA is AWS S3. This is the cloud file storage offering from AWS. In S3 you create so called Buckets which hold your files and folders. A Bucket also has an option called “static website hosting” which turns the bucket into a web root directory.
If you want to host for example an Angular application on S3, just build a production release and add the complete contents of the publish directory to the S3 bucket. This means all the HTML, js, css, images and whatnot. Now make sure public access is enabled on the bucket and then enable “static website hosting” in the properties. A unique URL will be automatically generated for your bucket. Visit the URL and behold your Angular application.
AWS CloudFront
So now that you have your basic SPA hosting set up, you can optionally take it to the next level with AWS CloudFront. CloudFront is the CDN offering from AWS. You can use it to deliver your SPA at high speeds to your users all around the globe. And remember, that initial page load is crucial to satisfy those impatient users! CloudFront also offers additional security such as protection from DDoS attacks and you can use it to link your custom TLS certificate and domain to your SPA.
5. Good container support
This one is also indirectly related to .NET, but good to know if you’re deciding on a cloud platform. And it’s definitely related to .NET if you take into account that nowadays containers should be in the toolbox of any .NET developer!
AWS has multiple container services, but the one I like to use is AWS Elastic Container Service (ECS). ECS has a feature called Fargate, which is basically serverless container hosting. So just like Lambda, you can use it to just run your code in the cloud without worrying about any servers and you pay-per-use.
So when to use ECS instead of Lambda? Well Lambda has a hard time-out of 15 minutes. This means that if you have a long-running task you won’t be able to run it on Lambda. Additionally, ECS allows more CPU and memory to be allocated to run your code. These two things combined make ECS an excellent choice for heavy tasks like big imports and exports or big data processing.
If you want to run for example your .NET Core console application as a serverless container on AWS, here’s what you need to do:
- Create a docker image using one of the .NET Core base images
- Create a container registry on AWS Elastic Container Registry (ECR)
- Push your docker image to ECR
- Create an ECS Task Definition for your image
- Create an ECS Cluster
- Run your Task Definition on your Cluster with Fargate as your launch type
- Stop the task if you want to stop your application. Or if the application exits by itself when it’s done then the task will be stopped automatically
The basic serverless stack for .NET applications on AWS
So these are my five reasons why I think AWS is a good choice for .NET applications. Of course there are also some downsides and annoyances to AWS and I will cover those in a separate article, but nothing to dismiss AWS over. To finish things up I just want to sum up the basic cloud stack you can use for your next cloud-native serverless .NET application on AWS:
- Web API: AWS Lambda + API Gateway
- Short-processing tasks: AWS Lambda
- Long-processing tasks: AWS ECS
- File storage: AWS S3
- Web frontend: AWS S3 + AWS CloudFront
- Relational database: AWS Aurora
- NoSQL database: AWS DynamoDB
- Message queue: AWS SQS
- Event bus: AWS EventBridge
Good luck!
Recente reacties